Setup
Follow these instructions to get going with MissionGuidance in the field.
Installation and Licensing
Install the latest version of SpatialExplorer on the field laptop and connect to rover as normal, updating rover to the same version as SpatialExplorer if necessary. In case you do update rover, do a test mission first. Never downgrade rover to a previous version.
You will need a license for "mission-guidance" and/or "agl-oracle". Check the Tools->Licensing menu for installed licenses. Please contact your sales manager or [email protected] for help.

Download necessary heightmaps as described on this page.
First connect the pilot's display to the laptop's display port, then setup windows to extend (not duplicate) the screen to that second display. You can press Windows+P to configure this. Start SpatialExplorer after doing this.
Start SpatialExplorer.
When using a Phoenix LiDAR Systems payload
Connect SpatialExplorer to rover (preferably using ethernet)
Go to Settings->Rover->Network and reduce the "Update Interval INS Poses" to 0.1s for a fluid display.
When using an Applanix AP navigation system

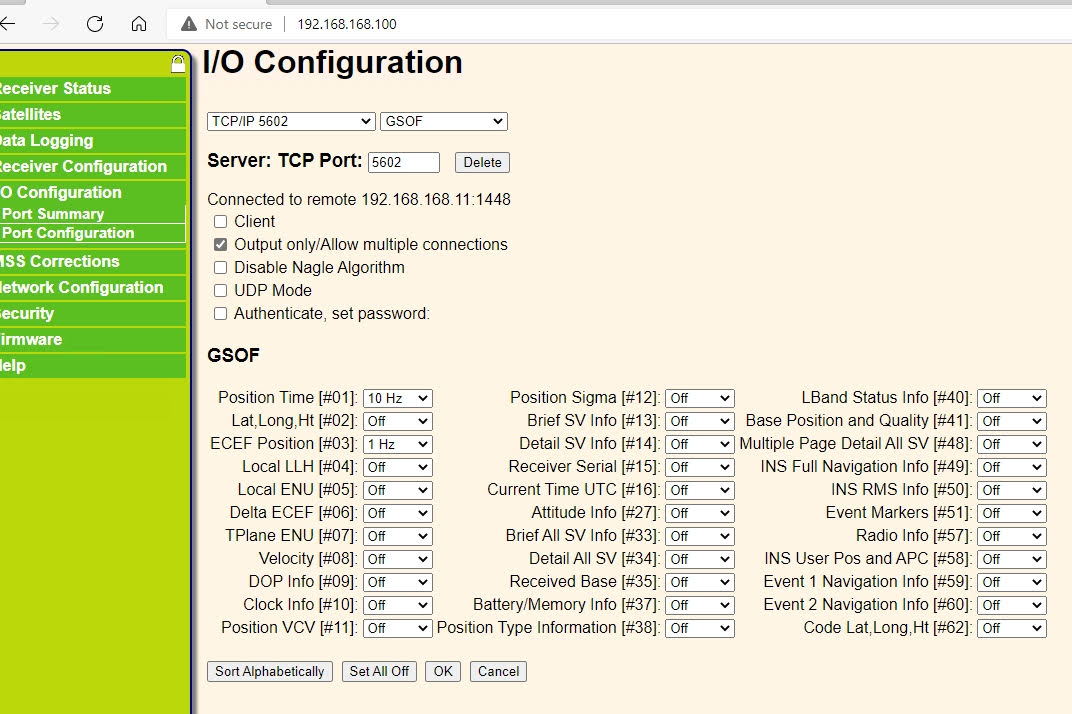
Make sure the realtime port of the applanix device (usually TCP 5602) is reachable from the computer running SpatialExplorer and configured as shown above. It is important to select
TCP/IP 5602 / GSOF
Position Time [#01] with 10 or 20 Hz
ECEF Position [#03] with 1 Hz
In SpatialExplorer, select "Connect to rover using WiFi or ethernet" and enter "ap://<IP-ADDRESS>" or "ap://<IP-ADDRESS>:<PORT>". In above screenshot, <IP-ADDRESS> would match the address used in the browser, so 192.168.168.100. Note: For SpatialExplorer versions 7 and older, use applanix:// instead of ap://.
When using an Applanix APX navigation system

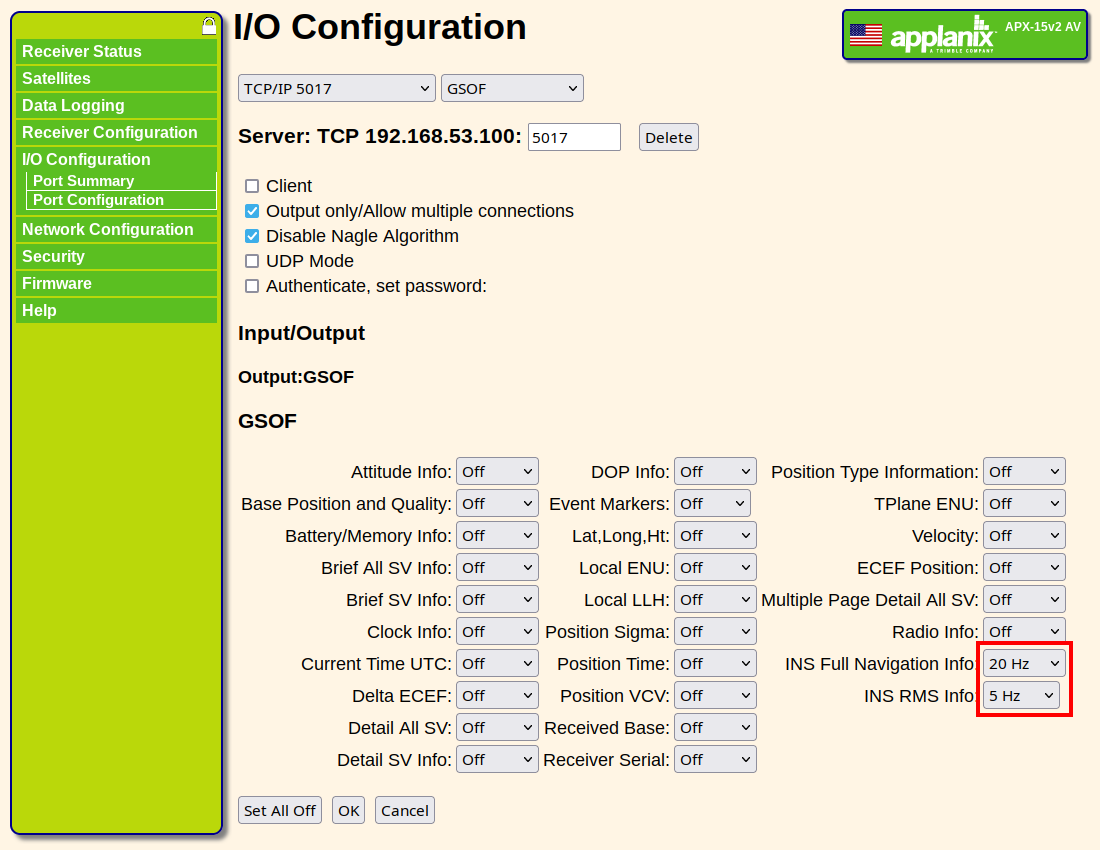
Make sure the realtime port of the applanix device (usually TCP 5017) is reachable from the computer running SpatialExplorer and configured as shown above. It is important to select
TCP/IP 5017 / GSOF
INS Full Navigation Info with 10 or 20Hz
INS RMS Info with 1 or 5Hz
In SpatialExplorer, select "Connect to rover using WiFi or ethernet" and enter "apx://<IP-ADDRESS>" or "apx://<IP-ADDRESS>:<PORT>".
When using a NovAtel navigation system
Starting with version 8, SpatialExplorer can parse binary NovAtel packets to extract navigation information.
In SpatialExplorer, select "Connect to rover using WiFi or ethernet" and enter "novatel://<IP-ADDRESS>:<PORT>". This port needs to be configured to send the following binary packets:
INSPVASB (Needed for vehicle postion and velocities, the rate of this sentence determines the display update rate)
CORRIMUDATASB or CORRIMUSB (Needed for turnrate)
For a fluid display, an update rate of 10Hz or 20Hz is recommended.
When using NMEA sentences
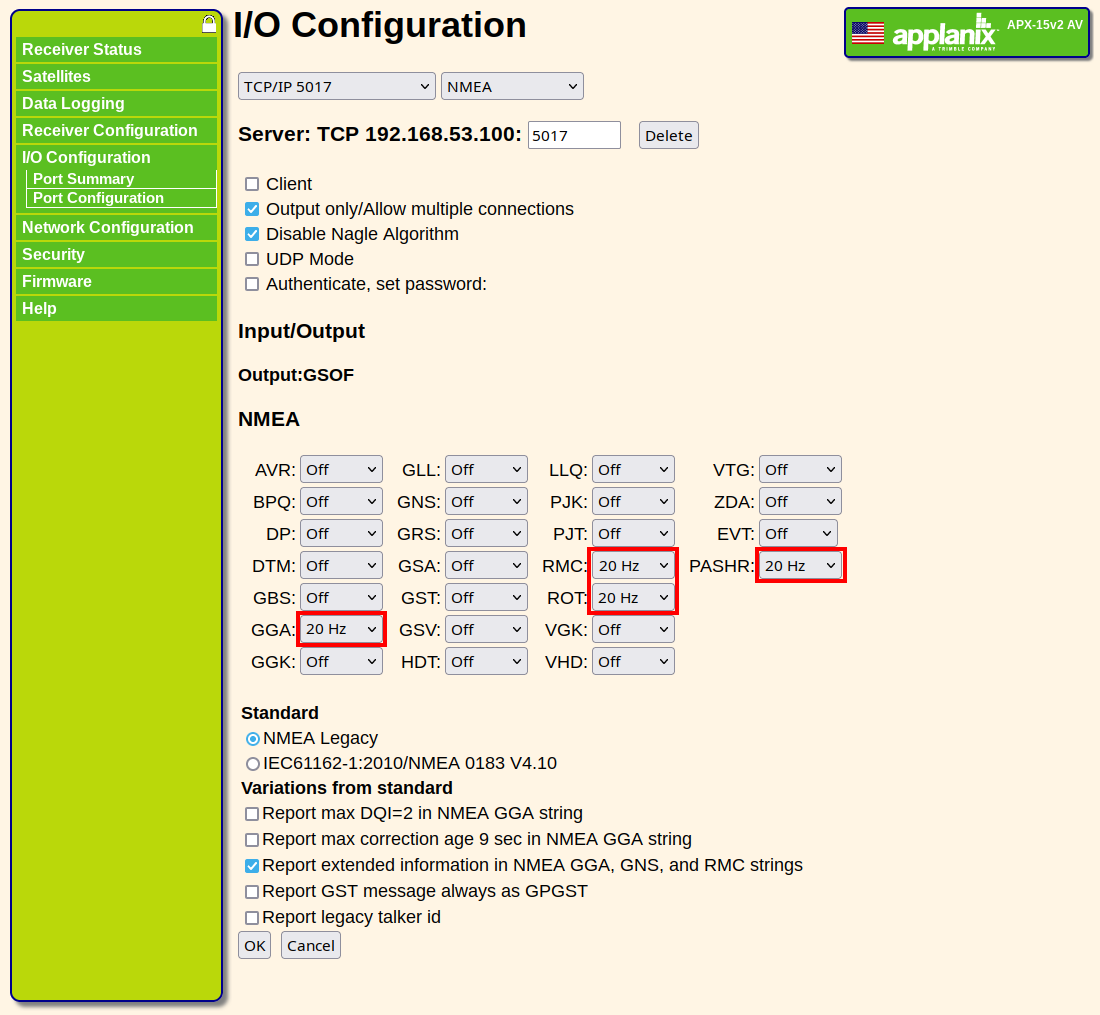
SpatialExplorer can parse NMEA sentences from any navigation system. If you encounter incompatibilities (e.g. with different NMEA versions), please report them to [email protected]. The screenshot below shows an example NMEA configuration for an Applanix APX system (for which, in practice, it is recommended to prefer Applanix APX GSOF settings above).

In SpatialExplorer, select "Connect to rover using WiFi or ethernet" and enter "nmea://<IP-ADDRESS>:<PORT>". This port needs to be configured to send the following NMEA messages:
GPRMC (Needed for vehicle postion and velocities, the rate of this sentence determines the display update rate)
GPGGA (Needed for vehicle position, including ellipsoidal altitude)
GPROT (If available, needed for turnrate)
PASHR (Needed for vehicle yaw/pitch/roll)
For a fluid display, an update rate of 10Hz or 20Hz is recommended.
Loading flightplans
Import the flightplan(s) as described here.
Go to View->MissionGuidance to open the pilot's window. Move the window to the pilot's screen and press "F" to switch it to fullscreen mode.
Last updated